https://lizscreativecorner.blogspot.com/http://lizscreativecorner.blogspot.com.au/p/my-canvases-and-altered-art.htmlhttp://lizscreativecorner.blogspot.com.au/p/my-tutorials.htmlhttp://lizscreativecorner.blogspot.com.au/p/challenges_24.html

Pages

My Lovely Friends,

Tuesday 29 October 2013

Tissue Box and a little tutorial

Hi guys me again, I've recently made a cover for a tissue box which I am going to put in my lounge, I made the background using my latest a gorgeous mask from my  Doobadoo DT kit, aren't I a lucky girl,
sorry lots of piccies, make a brew and get yourself comfy lol
This is the finished tissue box cover,

Now for the tutorial lol
you will need:
Distress ink pads, blending foam, blending daubers, Doobadoo mask art floral swirl stencil, white card stock, items to finish off you cover of your choice, easy lift tape,

This is the original box, I made a frame sorry not in the tutorial as your box could be a different size to mine,
This picture shows the mask with the first layer of ink on and the top picture is the finished one,
to start I took Pumice stone ink and blending foam and dabbed the ink through the mask lightly in some places and a little more defined in others, I also added a little weathered wood here and there too,
Next take a dauber and add Black Soot to it, starting at the flowers centres dab your dauber going towards the outer petals so you get a varied effect, as the ink dries the colours slightly change so wait a little while to see if you need to add more!
Using the same technique with another dauber this time using weathered wood I dabbed some of the leaves, I only picked the ones nearest the flowers but that's entirely optional, again I did the same starting at the leaf nearest the flower and working my way down to the edge, this will change the colours slightly as your going over a few layers of different ink but I love the look you get,
To finish my box off I cut my design to size, matted it  on to some coloured card stock and machine sewed all the edges, then I used Magnolia Tilda coloured with my copics in similar colours , then I fussy cut her out and layered her onto my box with Pin flair glue for a little depth, a few pearls finish it off,
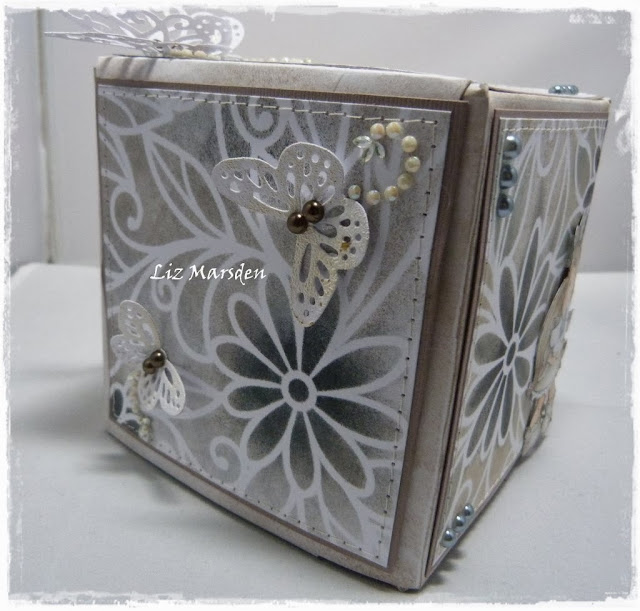
Side view using the gorgeous new Butterflies dies I got in my Noor DT kit, see I am a very lucky girl lol
these I have very lightly frantaged then added some pearls too and a crystal pearl string tail, all links below
This is the other side doing similar again only altering the butterflies flight,
The top of the box has another gorgeous Noor butterfly die on it which again I frantaged using only a hint and layered it up using two to again add a little depth, a crystal pearl tail and pearls finish it off, the cente hole was made using a spellbinders circle and scalloped circle die,
Finished box view again,
Recipe:
Doobadoo Mask art stencil - floral swirl - links to retailers on my side bar
Magnolia Tilda
Distress ink pads
Melissa Frances Pearls @ MCH
Prima crystal swirls - Tea Thyme @ MCH 
Noor Butterfly die - vintage flourishes 6003/0023 - links on my sidebar
Noor butterflies die - Vintage flourishes  6003/0033 - links on my sidebar

challenges
Tilda's Town - add bling
7 kids challenge - anything goes
Magnolia-licious - anything goes

I hope you like my little tutorial and want to have a go yourself,
catch you later,
Happy Crafting
Hugs Liz xx

Sunday 27 October 2013

last hint of summer

Hi guys,  I'm back today to show you my latest card for Totally Tilda challenge midweek which of course is to use a ticket, I made this for my sons girlfriend who's birthday was yesterday, 
I only just got these stamps as they were on order and only came late, well they weren't going away unused so here they are lol,
Hopefully it will have cheered her up on a very October day! On the road Tilda is coloured with my distress re-inkers as are the birds too, the fabby papers are from Teresa at my crafty heart, who has a sale on at the moment too, pop on over to have a look,
closer view!
Couldn't resist using the fabby gorgeous Noor butterfly edge die again too and the small butterflies dies that are from Teresa too, so love these and use them a lot, all links below
Here's my closer view of my ticket he he, the tags are made out of the paper pad and i just cut the edges and added an eyelet and twine, the envelope they are in is a Dobadoo mask shape which I  drew round,cut out of the double sided papers again from the same paper pad, all edges are distressed with my scissors and machine stitched,

Items used
Magnolia - on the road Tilda
Impression Obsession - butterflies die @ MCH
7 Dots studio mch ( sorry sold out)
Melissa Frances pearls @ MCH
Dobadoo -  paper art keys -472.948.009
Doobadoo paper art - leaves 
Doobadoo -Envelope stencil - 470.713.002
Joy crafts - Butterflies border die - 6002/0251
Ticket stamp - creative expressions
distress re-inkers

challenges
Midweek Magnolias - layers
Magnolia-licious - anything goes
Simply Magnolia - use pink, green blue

We are kindly being sponsored for this challenge by the fabby


thanks Nikki,
Hope you will join us in the fun!
Happy Crafting
Hugs Liz xx

Friday 25 October 2013

Halloween at la-La Land Crafts

Hi guys, I'm back today with my project for inspiration Friday over at 
our inspiration this time is Halloween and I've made a lantern

I made the lantern out of cardstock and cut an aperture in the front panel for some vellum, the gorgeous stamp is Bat Girl Marci from of course La-la- Land crafts and she is so adorable to colour,
the fab spiderweb corner die and pumpkins dies  are also from LLLC too,
Close up view of Bat Girl Marci, after colouring I fussy cut her out and layered her onto the lantern with Pin Flair glue,
On the sides I used the Spider web border die,

Lantern lit up at night with a battery T light,

LLLC - Bat girl Marci
LLLC - Pumpkins die 
LLLC - Spider web corner die - 
LLLC - Spider web border die -
Doobadoo paper art Bats - black Halloween 472.950.001
vellum
copics
Skin E000, E00, E11, E21, R30, R11, Eo4
Hair W0, W1, W3, W5
Orange - YR16, YR68, YR04, YR07
Browns - E70, E71, E74

check out the girls fabulous inspiration for you at La-La Land crafts
Hugs liz xx

Monday 21 October 2013

Christmas is coming

Hi guys, just popping on with a card I've made using the gorgeous new stamps from Magnolia, they were in the latest stamp kit and I love them lol
the card is made using Noor products too,
I hope you can see of my picture how 3D it looks as in real life it really does lol

The images are all coloured with my distress re-inkers, the snow is made using snow tex and the snow balls by liquid applique, so love this stuff for snow effects!!!

Here you can see a closer view of the snow effects,
I've used a couple of Noor bingo stamps and a corner die too all links below,
Both Tildas are fussy cut round then layered on with pin flair glue after being shaped slightly,
the paper is also by Noor and to finish off the card I've used the fabby snowflake on the edge die,
Challenges
Simon says stamp - Christmas
Tilda's Town - Christmas
Midweek Magnolia's - Song I'm dreaming of a white Christmas
Magnolia Down Under - anything goes
Magnolia-licious - Shaped card

items used
Magnolia village scene -
Magnolia - Winter wonderland collection - in the snow scarf Tilda
Magnolia - Winter wonderland collection -  in the snow ski Tilda
Joy crafts - snowflake border die - 6002/2021
Joy crafts winter paper pad - 6011/0019
Joy crafts Corner die - 6002/0136
Joy crafts Bingo stamps - 6410/0012
liquid applique,
distress re-inkers
cheesecloth
Go Kreate shape die

catch you later,
happy crafting!
hugs Liz xx

Sunday 20 October 2013

Just the Ticket

this time the challenge is to use tickets on your projects,
I've made a card using Ideaology ones from Tim Holtz,

This adorable Tillda  ( London Tilda) is coloured with my distress re-inkers and I have distressed the background too,
the fabulous papers are from the MME winter wonderland pad but thought they looked good on here too, so more useful than just at Christmas lol,
the main shape is made by using Go Kreate dies and a fab Noor doily die too,
closer view of London Tilda,

items used
London Tilda @ Bunny Zoes
Distress re-inkers
MME - Winter Wonderland pad @ MCH ( on sale now too )
Noor/ joy crafts doily die -6003/1002
Flowers - WOC and other
Pearls/ flower ribbon  - stash
Cheery Lynn doily die

We are again being kindly sponsored by the fabby 


Thank you Nikki,

I will check later for challenges lol

hope you will join us, remember the ticket!
hugs Liz xx

Friday 18 October 2013

More than one fold

Hi guys back today for inspiration Friday over at 
the challenge this time is more than one fold so I made an easel card, so love these,
The gorgeous stamp called sitting Princess Marci is coloured with my distress re-inkers then fussy cut out,
she is layered onto some gorgeous Maja papers wow loooooove these too  and I distressed the edges a little,
all are machine sewn,

I added diamond glaze to her flower wand thingy can't for the life of me think what it's called lol and added gem stones to her crown too,
I also used the gorgeous opulent ovals die from my crafty heart for the frame,

To make the easel card stand I've used  one of the sentiments from the stamp and stamped it onto aone of the booktab and labels dies from La-La Land crafts too, all links below

items used
Sitting Marci stamp with sentiments @ LLLC
Booktab and labels dies @ LLLC
Filigree corner die @ LLLC
Heart doily  Border die @ LLLC
Melissa Frances attic treasures ivory pearls @ MCH
Spellbinders - Opulent ovals dies @ MCH
Maja design - Vintage spring papers @ Live and Love crafts
Lace - stash
Flowers - WOC
distress re-inkers
Skin - Antique linen, tattered rose, vintage photo
Hair - Antique Linen
Dress Spun sugar, Victorian Velvet, pumice stone, shabby shutters
Crown  and flower- Scattered straw, wild honey,

challenges
Live and Love crafts - use pink

go check out the other girls inspiration for you too,
hugs Liz xx

Tuesday 15 October 2013

SALE AT MY CRAFTY HEART

Hi guys, just letting you know Teresa has a fab sale going on at My Crafty Heart

All items in the Christmas section
10% and 20% off,

All Saturated Canary stamps - 10% off,

All graphic 45 pads - 20% off,

 Go check out the bargains for an early  xmas pressies or a treat for your self,
hugs Liz xx

Sunday 13 October 2013

The Witching hour

Hi guys, back again with my latest creation for Totally Tilda's Spooky Halloween Tilda challenge and also for Lovely hAnglar or sweet Magnolia which is dots or stripes

Yet another Halloween decoration that will probably end up at Kay's, lol
I used a small Go Kreate die for the base and then used sitting witch Tilda again as this is the only one I seem to have, she is coloured with my copics again,
The Marianne clock die is stamped as is the Magnolia Doo Hickey castle die with a Stempleglede grunge stamp,
the vial is a Tim Holtz Ideaology and I added a few berries like flowers of a flower stem that had seen better days he he,
The pumpkin is by La-La-land crafts links below and I used the base die cut a few times and layered together for effect,

Hopefully you can see the dots on the paper and stamp lol
again I fussy cut Tilda out and shaped her before I sat her down and fixed her in place using some acetate, the boo at the back is held with acetate too, 

items used
Magnolia sitting witch Tilda
Copics
Magnolia Doo Hickey castle die
Tim Holtz Ideaology glass vial
Go Kreate XXL frame frilly #7 die
Marianne clock die
La-La Land crafts -  pumpkin die

Halloween frames and shapes - skull and cross bones/ Boo chipboard @ LLLC
we are being sponsored this time by

Stamping all day
with this awesome prize,
Thank you,

Challenges
 stamp and create with Magnolia - dress up for halloween
Country view crafts -  Something Spooky
 you me and Magnolia - anything goes

Remember there is still a week to join in the fun,
Hugs Liz xx

Saturday 12 October 2013

Trick or treat at Doobadoo

Hi gys, just popping by with a project I've put together for Halloween using some of the fabby Laser paper cuts from  Dutch Doobadoo, I was so lucky as they were part of my DT kit when I got home from my Hols, a nice coming home present that, he he
Links to suppliers are on my sidebar
I've made a lot of Halloween projects this year due to  my DT'S and there are more to come!! so I decided to make a treat bag!!
a little tutorial is below!!!

Items needed

Dutch Doobadoo - Black Halloween  Laser paper cuts - 472.950.001
Dutch Dobadoo - Dutch Mask Art A5 Spiderweb - 470.715.011
Dutch Doobadoo - Dutch shape Art 15 x 15 cm shape - 470.713.100
raffia lace
designer paper
black card stock
distress ink
distress tool
cellophane bags
removable masking tape
cheesecloth (optional)


tape  the spiderweb mask onto the reverse of the bag to hold the mask in place, the bag is smaller than the mask so it holds it on the edges underneath,
dab black soot through the mask carefully trying not to move the mask as it's on a slippy surface, sorry about the pictures they are catching my lights etc,
when you have the desired level of ink on, carefully peel off the taped mask touching only the edges as it will be full of ink, lol

Hopefully you can see it better on this picture, the bag has been left to air dry a little while, the dried very lightly with a heat too, don't hold the heat tool  too close or you will shrink the cellophane then last I put a piece of kitchen roll flat on the top and placed my hand over it, pressing  it lightly to remove any last hints of wet ink, the bag is completely dry now to play with,

Too do the top I drew round the dutch art shape on black card then cut it out, I did the same with the next size down out of designer paper then distressed the edges of both with my distress tool,
Fold both of these in half  and finish off with the laser cuts as desired,
I used some staples to fix my top on my bag after turning the top of the cellophane down and over on itself to keep the contents fresh!!


Hopefully you can see the spiderweb design on the bag!!

Happy Halloween
TRICK OR TREAT!!!!!!!
hugs Liz xx

Friday 11 October 2013

Mask or merge at la-La land crafts

Hi guys, back again for inspiration Friday over at La-La land crafts, this time the challenge is to mask or merge the images,
here is my card coloured with copics

The masked images made a large picture so I made that the full focal point and just added a few flowers and distressed the paper edges for effect,
closer view,

Items used
Ruffles Marci - La-La land crafts
Lil' Rocker Luka - LLLC
Brick wall set - LLLC
Scallop border die - LLLC
7 Dots paper pad @ MCH
(The Tag came off one of the  paper pad sheets too,)
distress ink - spun sugar edges of image
Stempleglede -grunge collection stamp -edge of image
Adirondak - Espresso ink pad
copics
Skin - E000, E00, E11, E21, R11, R30
Pinks - R81, R83, R85
Blue's - B000, B00, B02 B91, B93, B95
Hair Marci - E51, E53, E31, E35, E57, 
Luka's hair - E31, E25, E29
Guitar - E07, E08, E09, E50, E51, E53
Greens - G94, G28,
Bricks - W0, W1, W3, W5
Greys - C0, C1, C3, C5

check out the girls awesome creations,
hugs Liz xx

Tuesday 8 October 2013

Christmas is round the corner

Hi guys, phew caught up with my washing and cleaning, leaving a son in the house when you go away is not a good idea lol,

over at deep Ocean the challenge this fortnight is as my title
Christmas is round the corner, well the weather is so warm still it doesn't feel like winter yet so it felt strange making this card before I went away, good job I did too or else it wouldn't be here lol,

The gorgeous Christmas scene is coloured with my distress re-inkers and has a little liquid appliqué on the fur trees, the snow effect is made using snow tex too,
Tilda with snow heart is coloured with my copics and I fussy cut her out then used the liquid applique' for the snow heart and fixed her on using pin flair glue,

Her hat has glamour dust on,

I've also used the fabby Joy crafts bingo cards stamps, Winter paper pad, the snowflake die and numbers die too, links below
we are being sponsored by live and love crafts,
thanks so much xx

 items used

distress re- inkers
copics
Magnolia Tilda with snow heart
Magnolia - scene stamp
Noor Joy crafts - Bingo cards stamps - 6410/0029
snowflake border die - 6002/2021
Joy winter paper pad - 6011/0019
charm/ twine stash
Flowers - Hobby House
Snow Tex
glamour dust
Liquid Applique'
sewing machine
distress tool
Go Kreate die

Bunny Zoe's - something blue
Magnolia-licious - shaped cards

Hope you'll join us with your Christmas creations,
hugs Liz xx

Monday 7 October 2013

Mini candi time

Hi guys, I'm back from my hols, had a really fab time lots of fun, laughs and good weather for Britain too!
so had a look on Random Org for the winner of my mini candi and it has picked

number 3

if you write e-mail me with your postal address Crea I will get the candi out to you as soon as possible,
Thanks to all who followed my blog and for your lovely visits all very much appreciated,
hope to see you soon,

if i have not heard by monday 14th i will re draw
hugs Liz xx

Sunday 6 October 2013

Spooky goings on at Totally Tilda

Hi guys, back today with my hanger for Totally Tilda, I don't really do Halloween but Kay loves it so all the projects I've done will probably end up at her house lol
The base is made using a Go Kreate die and the cheesecloth looks like cob web to me, I slightly sponged black and grey distress inks on to darken it slightly,
the background scene is made by using a Magnolia moon stamp which I have distressed with distress ink and ink dusters, small tutorial below
the fabby chipboard house/ fence and bat were part of my DT kit from La La land crafts, they are awesome!!! I added tiny pearls to the bat for it's eyes, all the chipboard items are coloured with distress inks,
the pumpkins are also from La la land crafts are are a fabby die cut complete with the face dies,

Tilda is coloured with my copics then fussy cut out and I bent and shaped her legs so she sitting down, to finish off the hanger I added a bit of gesso here and there,

Mini tutorial

To do a scene like mine you will need 

ink dusters
watercolour paper
distress inks - weathered wood/ black soot
Magnolia - moon stamp

I stamped the stamp roughly were I wanted it to be, not to high up and slightly off centre,
then I got the la la land crafts heart tree which I had cut out of card stock and placed it roughly where I wanted a cast shadow to be,

I then dabbed the two colours of distress ink through the tree holding my ink duster upright, sorry I have no pictures of this as I so need another pair of hands and hubby was at work lol, going round the outside of the tree also gives it a  depth shadow too,

keep the die cut  tree as you can then use it on your project!
shown is a tree using a lighter cardstock where as on here I used black,

when this is done I take my ink duster and my weathered wood and using side brush motions sweep from the side edges into the middle using light strokes in the centre for just a hint of colour so the moon appears to cast a shine, I  usually dab off a little of the ink on scrap paper for a lighter tint too, then go over this with the black soot again using sweeping motions from the sides, I used the ink from the pad straight onto my paper for this and lift my brush off using  a flicking  motion,

 again sorry i have no pictures but if you would like some just let me know and I will do a tutorial again with hubby's hands ready to hold the camera lol,

I keep on doing this till I get the right amount of colour/depth I want,
I also did the same background on my la- la -  land bat girl project  using the (paler card stock tree) a few posts ago, scroll down if you would like to see that too,

I then mounted the scene onto card too finish off,
we are kindly being sponsored today by


with this awesome prize pictured above, thank you so much xx

Items used
 Magnolia - So spooky collection - sitting witch Tilda
LLLC - pumpkin die
copics
spider - hobby craft
I'm looking forward to seeing your spooky Halloween creations, so join us in the fun,
hugs Liz xx