https://lizscreativecorner.blogspot.com/http://lizscreativecorner.blogspot.com.au/p/my-canvases-and-altered-art.htmlhttp://lizscreativecorner.blogspot.com.au/p/my-tutorials.htmlhttp://lizscreativecorner.blogspot.com.au/p/challenges_24.html

Pages

My Lovely Friends,

Monday 27 March 2017

Mothers Day

Hi all, I thought I'd show you the card I made for my mum for mothers Day yesterday,
I got this book die the other day and wanted to make a book style card for her using the papers from Pion design - The Songbird Secret, which I bought from Tracy's shop, I distressed the edges of the papers,
For the front one I used the die on some vellum and printed a sentiment onto it from the internet, then I cut out the shape, I then creased it in the middle, then slightly bent back the edges on the two sides to make them stand a little forward,
I
I added some of the gorgeous gem embellishment that was in one of the Crafteezee collections, I have loved using this,
On the other side I used a gorgeous lace butterfly which again was part of a collection, I then added a pearl to it from my stash, the flowers were part of my craft stash too,
Do check out the gorgeous goodies Tracy sells in her online shop or treat yourself to a

Challenges
Deep Ocean - flowers everywhere
My mum loved it so that was good, he he
Oh well I'm off to get ready for going for Tegan from school,
catch you later,
Happy Crafting!!


Wednesday 22 March 2017

Feeling Spoilt

I'm here today with my inspiration card for 
using the image feeling Spoilt
wow!!! so  love this image!!
I've coloured her with my distress ink pads, I'm  loving the softer look I can get with these at the moment!! I made it for my Daughters Birthday a couple of weeks ago and she loved it!! now as you know I usually don't do fuffy for Kay but I couldn't resist, lol

The Pion Design My Precious Daughter papers were in my stash, which had been lurking there forever but when I saw them and the  banner I just had to use them,
They also went fabulously with some of the products I got in my monthly collections I got off Tracy 
Crafteezee at Noor design UK,
I used the  beautiful gem strip, along the edge of the image, and the coulered Gem at the top too from the kits, then some of the flowers from my stash,
I also used the adorable little glass embellishment tucked under the flowers here too,
I also added one of the silver coloured metal hearts on the banner at the bottom too,
Don't forget we have a challenge over on the blog and a Facebook challenge every month  too,
Challenges
Deep ocean - Flowers everywhere

See you soon,
Happy Crafting!!!

Sunday 19 March 2017

My first handmade album

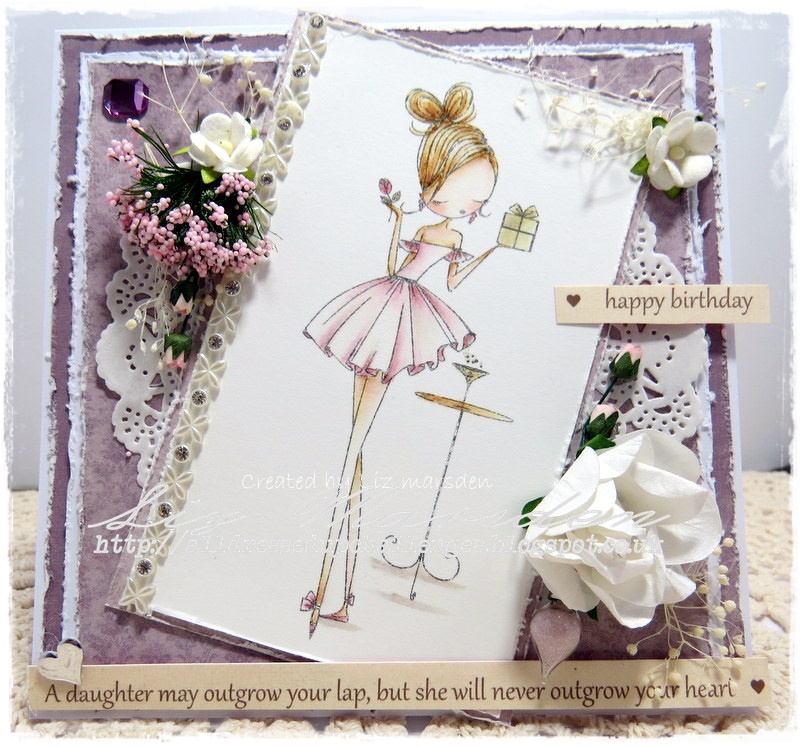
Hi guys, I thought I'd be brave and show you a album I have made from scratch, using a lot of stuff in my stash and some of the products from Tracy at Noor design UK,
I went online to see tutorials on how to make albums, page styles, pockets and the way to hinge my pages, I took some ideas off one or two and kinda mixed them up, lol
There are lots of photo's so you may want to get a brew!!! lol
I had some chipboard in my stash so used this as the base of the album, which I then covered with some canvas style stuff ( so technical) I again had in my stash, lol

I then used the adorable paper collection Theodore and Bella by Pion design which I got off Tracy, so love these papers!!!
I took one of the images and made a frame to go around it, adding some flowers from my stash and some fabulous vintage seam binding with a teddy bear charm again from Tracy's shop, the edge trim is a Martha Stewart one,
The little one chipboard came from Monika at Love to create and craft, it also said welcome home in the set too, so I just used some of it,

I added some pearls and lace plus a feather again from my stash,
I used some ribbon, flower and continued the lace round from the front, the metal bronze coloured heart brad came from the latest Sweet Romance collection from Tracy,
I used some waxed white twine from Tracy and added some letter beads I've had in my stash forever,
I have kept the back fairly plain, 
I again used some lace in my stash for the ties to keep the album closed,
Now for the inside photo's
I used one of the adorable images as a pocket, adding a little lace and a doily behind, the lace bow is again from my stash as is the ribbon down the edge, all these came from a local market,
For my next page I made this envelope style holder tied with ribbon....
....So when open, you can add photo's or journaling etc, the gorgeous wooden peg which again came in the sweet Romance kit is only there to help me keep the pages open for the photograph, I really need three hands sometimes, lol

This next page has a strip from the paper onto which I have added a little stamping, the oblong frames behind are from one of the papers and you can pull these out to add photo's journaling etc,

The page opposite has this adorable cute dog paper which I have made into two pockets and finished them off with a M/S punch,

Hopefully your still with me, lol

So this time I made a side opening, again closed with some ribbon from my stash, again on the front is a picture off the papers and I again added a little text off a stamp,

As you can see I again added some stamping then used the adorable dog paper as an open border for something to be placed inside, tags etc, behind is another pocket,

I continued the dog theme on the opposite page just turning back the top edge, this is open on the left edge for a tag etc, behind can be used for a photo etc,

The next page is made using one of the images again as a pocket, 

This page has a flap on the right hand side which opens up, the adorable die for the buckle is a Noor design die I have in my stash, I cut it twice out of card stock and glued them together for added strength, the strap is one of the border strips,
The inside, is a pocket, 
Yet another envelope style opening, again tied with ribbon and lace from my stash, 

The inside has again the paper turned back, and only fixed at the bottom, so photo's, tags etc can be added,

This is the back inside page, using one sheet of the adorable papers, a die cut section for a photo, and a metal corner from my stash,

On a couple of the pages inner sections I have a large tag, for a photo or journaling,
shown below,


I made these out of the papers and  some of the Pion design Palette, so I kept the backs plain for journaling or another photo, a little ribbon works as the tab, as shown below,

Well I'm sure there are lots of mistakes and true album makers will be cringing!!, but I really enjoyed making it, even though it took a while to make, lol
Please let me know what you think but please  be kind!!!! he he
Challenges
Deep Ocean - spots and or stripes

Happy Crafting!!

Wednesday 15 March 2017

Some Bunny Loves Me

Hi, today I'm here with a card for our All Dressed Up challenge, which as usual is anything goes as long as you use an All Dressed Up image,
I've used Some bunny loves me as I thought it would be fabulous for an Easter card image,

The papers are by Maja Design and Anna Marie design and I've distressed the edges,
The image is coloured with distress ink pads,
Isn't she cute with her little bunny? aw!!!
I added a die cut egg which was from love to craft and create and I added some flowers from my stash,
The top of the card has a chicken wire die with yet more flowers I've had in my stash forever, lol
The Ivy chipboard I kept in it's natural colour, this was part of the Crafteezee In the Garden collection from Tracy at Noor Design UK

Challenges
Noor Design Uk - Spring

Well a lovely hint of spring!! just what I need, lol
Happy Crafting!!

Tuesday 14 March 2017

Time To Celebrate

Hi, I have made a card using some of the beautiful products from the latest Crafteezee collection
Sweet Romance from Tracy at Noor design UK
I used the papers which are by Maja Design from the kit, the gorgeous lace hearts, pearl string and the adorable love charm,
I coloured this Fizzy Moon - Let's Celebrate from my stash with my distress ink pads adding a little hint of star dust  stickles on the glasses, he was then fussy cut out and layered onto my card with 3D foam,
I love the layered look as you know so I distress my paper edges and tore some of them too raised them up with some foam pads and added a hint of lace in between the top and next layer as well,
I the layered the hearts adding the adorable Love charm and a flower from my stash, plus a few different die cuts, I so love this heart string on the bottom,
Do check out these and some of the other kits still available or why not pre-order the next one here,
Ive just seen I have got some more lovely friends following me, thank you so much, you've made my day!!
I'm back on Wednesday with my card for All Dressed Up, see you soon,
Happy Crafting!!

Monday 6 March 2017

Welcome little one

Thought I'd show you a card a card I've made using some of the products from the latest
 Sweet Romance collection off Tracy at Noor Design Uk
Now as you can see this time I've used it for a baby card, just goes to show you don't need too use it only for Weddings etc, lol
The Pion Design papers Images from the past which I bought from Tracy are used on the base and layers of my card, all the edges are  distressed with my distress tool,
I took one of the gorgeous images from the paper and added a little text with a stamp from my stash by Kaisercraft - little one, using some memento ink in Rich Cocoa,
I used some lace from a previous Crafteezee collection then a gorgeous lace heart and wooden heart peg from the Sweet Romance kit,
Behind the lace heart I added a Fantasy die - Bazaar, which I again got off Tracy's shop,
I then used the adorable string of hearts and  some flowers and seam binding from stash,
There are so many gorgeous products in this and all these kits, they are so worth a look,
Till next time!!!
Happy Crafting!!

Wednesday 1 March 2017

A little bit of Paradise

Hi guys, I'm here again today with my inspiration for 
Crafty enjoyments with a 3D project for you,
I love palm Trees, weird hey!!! lol
so I couldn't resist playing with this adorable scene!
I have done a mini tutorial for you on too, 
Separate all the pieces in the kit,
Trim down any little pieces off with scissors that joined the pieces together,
I took a glue pen and ran it along the bark section of the trees,
added some aged Ivory Frantage over the top, then heat set them, make sure you don't add any over the bit at the bottom were it fits into the base,
I did all the leaf sections with some distress crayon in antique linen spreading it out with my finger and a slightly damp wet wipe, then I did a another layer on top with peeled paint, again spreading them out again the same way,

I then went over again with the peeled paint making them bolder by not blending them, leave these aside to dry off a little,
I covered the base sections with some colour blooms spray in Antique Gold by Prima, when dry fix the  base sections together using glue,
Seen Here, leave to dry
I sprayed the lounger sections with some Colour Blooms in Glistening waves and some Lindy's Gang Flat Fabio - T- bird turquoise,

Make sure you dry these very quickly or the chipboard will warp, I would probably only use a dry medium again to be honest, like the distress crayons etc, assemble the pieces together,

Take the leaf sections and join them together in the notch cut outs, adding a little liquid glue to one end to be fixed together I then added some white beads for a little interest, when dry assemble the  rest of the scene,

I finished it off with a flower from my stash, the flip flops that came with the kit, and a sunglasses charm,
So when it's a horrible day, I just look at my hint of a summer paradise and dream I'm there !!! lol
Here is a link to the kit for you
Under the palm trees - 1003 Cardboard

I hope you have enjoyed my mini tutorial,
Happy Crafting !!!!